Hi everybody! Haven't posted in a while because I didn't have any real thoughts on what to post about. Today I wanted to share some tips that have helped me with a nail problem. For a while, I've had peeling on my nails, which has been frustrating and discouraging. I've tried many different things and have read through many nail blogs and gathered some tips that have worked for me. I thought I'd share this with you all today, so here they are:
1. Moisturize. Nails need to be properly moisturized so they don't end up dried out and peeling. I like OPI Avojuice skin quenchers for an everyday lotion because it leaves my hands soft/moisturized and it smells great! At night I use Lush's Lemony Flutter cuticle butter.
2. Hydrate. Drink plenty of water through out the day to keep your skin and nails healthy and moisturized (from the inside out).
3. Glass Files. To file my nails I've been using my NailTek glass file, which isn't too rough on them. I file from one end to the other (one motion) because I've found when I file back and forth in a "sawing" motion my nails would start to peel.
4. Clip nails only after they've soaked in water (say like after you shower) and are softer and easier to manage. I also noticed that if I would clip when dry, my nails would actually crack! (My nails are a bit thick so clipping them dry would be harder on them).
5. Only file when dry. This took me quite some time to realize. I used to file my nails after I would shower once I finished clipping. I then read that water swells and separates the layers of the nail (which might be another reason people get peeling nails if they constantly immerse their hands in water...so use gloves). Once I began filing my nails only when they were completely dry is when I saw some dramatic results...no more peeling!
Just to throw a few more things out there, I use OPI's Original Polish Remover (it's a green one that is "enriched with aloe vera" and is "non-oliy") that I get at a local beauty supply. It removes polish effortlessly and doesn't dry out my nails. Additionally, I've been using Deborah Lippmann's "Hard rock" as a base coat which has helped harden my nails. Once in a while I give my nails a "break" for a day, or even a week, by not using anything on them and simply moisturizing (I've felt that when I continuously wear nail polish, my nails start to look yellow).
I hope these tips were helpful to some of you experiencing some trouble with peeling nails as well. I am not a nail technician, medical professional, or expert. What worked for me might not work for everyone else but it might be worth a shot. Thanks for reading!
Saturday, May 18, 2013
Tuesday, July 5, 2011

Sunday, January 16, 2011
"Mannequin Hands" Polish:
I've been meaning to post these up...Here are some swatches of nude/flesh toned nail polishes I've tried.
All polishes side by side:

On my nails *for comparison purposes, I did 3 coats of each (although some didn't need 3 for an even/nice application*:
Pinky: OPI "Samoan Sand", Ring: Essie "Jazz", Middle: Mirage "French Touch" *similar to Deborah Lippmann's "Fashion"<3*, Index: Jessica "Creamy Caramel", Thumb: MAC "Abalone Shell"
Outside in direct sunlight:

Indoors/Artificial light:

Indoors/Natural light:


Please excuse the horrible application/messy+dry cuticles...didn't take time to clean it up for pics. :-(
BTW I'm holding MAC's Golden Nectar High-Light Powder *LOVE as a highlight/blush*
How about you? What are your favorite "skin" toned polishes?
Sunday, December 19, 2010
Recently purchased mascara.
I've forever been in search of a mascara that LENGTHENS my lashes. I've tried many drugstore and department store mascaras but haven't found one I LOVE yet. I recently bought MAC Fibre Rich lash in All Black, d.j.v. Beautinizer Fiberwig LX in Pure Black, and Yves Saint Laurent volume effect faux cils in Noir Radical.
After a week of testing out each one, here is what they did for me:
MAC:
Beautifully volumizing, fairly lengthens, buildable, amazingly priced.
d.j.v.:
SUPER DUPER Lengthens (yes that "super duper" was necessary), conditions, separates, fairly priced, Easy to remove (warm water), full of fibers that "attach" to lash tips to lenghten lashes while looking natural (without looking spidery). Pretty much a primer and mascara all in one, worth it! <3
YSL:
Volumizing/defining, conditions, a bit heavy (creamy), fairly lengthens, smells great!, PRICEY. :/
What else can I say, I'm not comparing the brushes more the product...ha. I don't really look for "curl" power since I curl my lashes with a lash curler before hand. None of these smudged on me and I used them for everyday tasks (mainly while at work).
So over all I would definitely recommend DJV for lengthening your lashes beyond what you've ever hoped for in a mascara (no need for primers!). When I apply this mascara I concentrate only on the tips of my lashes since that is where I like those little fibres to stick (and lengthen!), then I use the YSL at the base to darken the roots/base of my lashes and make them look thicker/volumized. :) Try it!!!
*If I get access to a camera soon I will definitely post up pictures to compare the three. :P *
Friday, October 1, 2010
Konad Try-outs
Hey there! I know it's been a while since my last post but I finally got access to a camera...so I decided that my second post would either be make-up or nails...so here are my wee little NOTD! This was my first time using konad image plates, so it didn't come out as I had hoped *I suck at placement of the stamp! haha. Also, the outcome was different in my head, but whatcha gonna do!* ;P
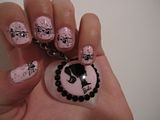
I used 1 coat of Nail Tek foundation II as a base, OPI's Mod About You (2 coats), Wet n Wild in Black Creme, and one coat of Seche Vite's dry fast top coat (Any one know of a good no-chip top coat? after like the 2nd-3rd day my nails start chipping, is that normal?) For stamping I used the little flower design on m71 and for the bows, m56:
*CLICK ON THE PICTURE TO ENLARGE*
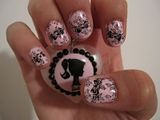
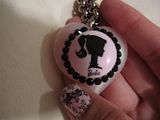
Barbie necklace by Tarina Tarantino. Love it!:
As you can see, I also failed at picking up the stamp off the plate for a good clear image...this was the first hand I did! I hated the fact that my left hand always comes out better when it comes to base color application *evenness*, but I had to mess up the design! ^0^ *whyyyyy???!!!!*
Oh well, I suppose I just need time/practice...Here's this:
So what helped me to do it better the second time was this video by the lovely Asami:
Very informative/useful video for me.
Check out her blog for some inspiring nail art: http://www.nailsbyasami.com
I'm glad I came across it, because at first I though "Oh no, I actually NEED the konad special polishes! Now to wait another week for my order...grrrr". Thanks Youtube! :D
So what was YOUR first experience like with Konad image plates?
Thanks for looking!
I used 1 coat of Nail Tek foundation II as a base, OPI's Mod About You (2 coats), Wet n Wild in Black Creme, and one coat of Seche Vite's dry fast top coat (Any one know of a good no-chip top coat? after like the 2nd-3rd day my nails start chipping, is that normal?) For stamping I used the little flower design on m71 and for the bows, m56:
*CLICK ON THE PICTURE TO ENLARGE*

Barbie necklace by Tarina Tarantino. Love it!:

As you can see, I also failed at picking up the stamp off the plate for a good clear image...this was the first hand I did! I hated the fact that my left hand always comes out better when it comes to base color application *evenness*, but I had to mess up the design! ^0^ *whyyyyy???!!!!*
Oh well, I suppose I just need time/practice...Here's this:

So what helped me to do it better the second time was this video by the lovely Asami:
Very informative/useful video for me.
Check out her blog for some inspiring nail art: http://www.nailsbyasami.com
I'm glad I came across it, because at first I though "Oh no, I actually NEED the konad special polishes! Now to wait another week for my order...grrrr". Thanks Youtube! :D
So what was YOUR first experience like with Konad image plates?
Thanks for looking!
Wednesday, July 21, 2010
Review: Clean & Clear V.S. Neutrogena
First post! Better late than never I suppose...I will be reviewing the Clean & Clear® Blackhead eraser™ V.S. the Neutrogena Wave Shine-free blemish free pads *refill pack*. (I only used these products on my nose because I was looking to eliminate my blackheads, and that's mainly where i have them.) So for Neutrogena I didn't actually use the machine *"The Wave™ Power-Cleanser" as they call it* because I didn't feel like it would make a difference to the performance of the product itself, my hands are good enough for me! I first bought the Clean & Clear blackhead eraser *which comes with both a pack of 20 refill pads an small battery powered vibrating "cleansing/exfoliating" device*. After one use with that machine I realized it didn't get into the small areas around my nose, so that's why I decided not to get the Neutrogena one. I then bought the Neutrogena pads and tried them out the next week. Verdict: the Neutrogena pads left my nose much more "cleaner" looking than the Clean & clear pads. Although the Neutrogena pads seemed a wee bit rougher to the touch I felt they left visibly less blackheads that the Clean & Clear pads.
-Both brad pads are the same size so can be used with either machine! *Maybe one device is easier to handle/hold than the other?*
-Both are used the same way *hold/pass under running water to "activate" foaming pad for use*
-Main ingredient for both of these products was: Salcylic Acid (1%).(acne treatment/medication)
-Neutrogena claims to eliminate oil and clear blackheads
-Clean & Clear claims to remove dirt and oil/reduce the number of blackheads
-Both have their own soapy smell *which isn't unbearable*
-Neutrogena says it's gentle enough for daily use
-Clean & Clear is recommended for use only 3-4x a week
By the above statements I realize they both did what their packaging claims to do *Neutrogena practically eliminated my blackheads while Clean & Clear reduced my number of blackheads*
Neutrogena has different pads like the deep clean foaming pads (I think these are the pads their machine comes with) or the gentle exfoliating pads, I'm not sure if Clean & Clear has their own variety. Also, I heard Neutrogena has a similar machine with TWO speeds*The Wave Sonic duo (one for gentle daily cleansing and the other for deep pore cleansing). I haven't tried any of these, so if you have/have had a more successful experience with any of these or other products please feel free to enlighten me! ;)
I wish I had pictures for the results but my camera is experiencing some technical difficulties at the moment. I won't get into the prices of these because they vary from store to store, so depending on where you shop. You might be able to get a coupon for these babies, just google it! hehe. I have no idea how long ago these came out but I recently decided to try them. Hope this helped someone!
Subscribe to:
Posts (Atom)